
: PCB, CVR, Senders & Gauges Explained")
FSJ Gauge Cluster Testing & Restoration (1973–1985): PCB, CVR, Senders & Gauges
Author: Adam McDaniel, JeepRecyclers.com
Applies to: 1974–1985 FSJ clusters (and principles useful across 1963–1991)
Quick Safety Note
Electrical work on 40–50-year-old wiring can cause fires if done incorrectly. Inspect for chafed wires, melted insulation, and loose connections. “Good enough” doesn’t apply to electrical—fix issues before powering anything.
5:56 — Essential Tools & Corrosion Management for FSJ Gauge Cluster Testing
Why corrosion kills gauges :FSJs use open-air connectors that let moisture (electrolytes) in. Add 12V and you get corrosion that may not be visible yet still adds resistance and causes gauge errors.
Clean first, troubleshoot second
- Isopropyl alcohol (IPA) – Flush connectors and pins.
- Diamond-tip electrical terminal cleaners – Match size to male/female terminals to scrub inside the Gatling-gun plug and ground sockets.
- Light abrasive pads / brass brush – Scuff the metal backplate where gauge tabs ground to the cluster.
- Dielectric grease – Thin film on reassembled connectors as a moisture barrier.
- Gloves – Wear gloves when handling the board to avoid fingerprints/salts that seed future corrosion.
16:28 — FSJ Gauge Cluster Bench Testing Setup
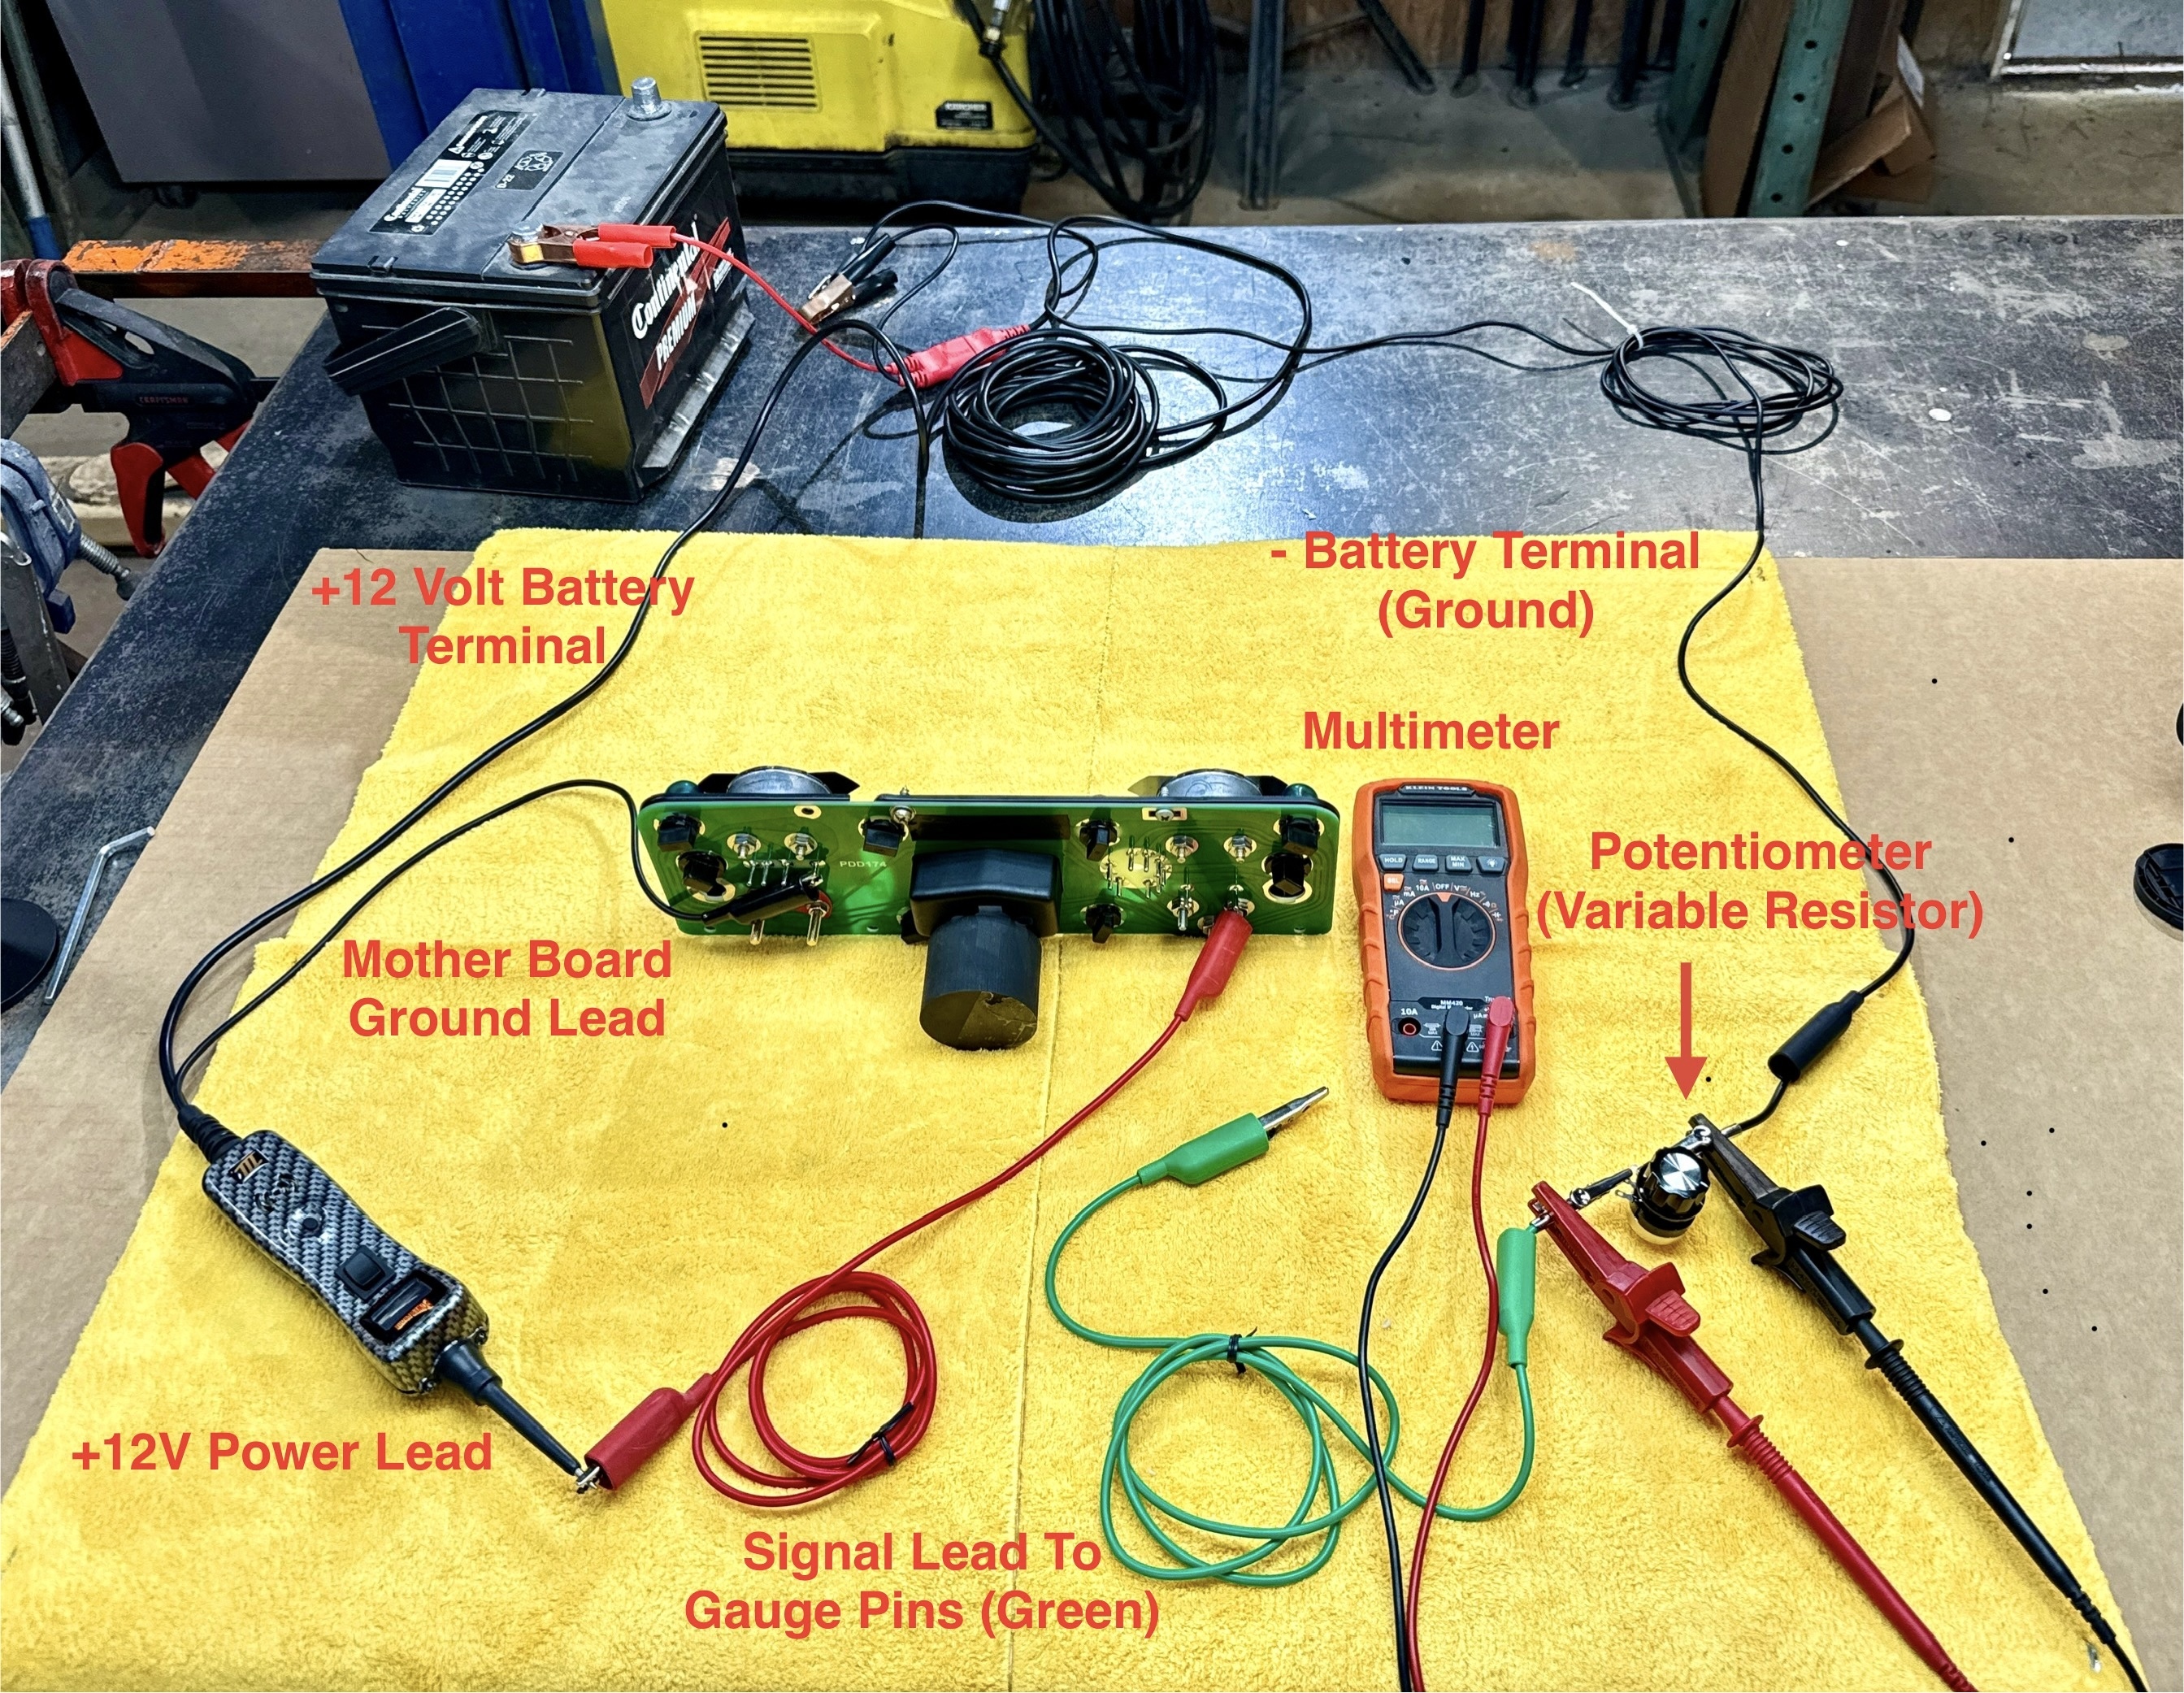
You’re simulating the vehicle harness with a safe, repeatable bench setup:
- 12V source (battery or bench supply)
- Power Probe (or a fused +12V lead, 1–5A fuse inline)
- Potentiometer (variable resistor) to simulate sender resistance
- Multimeter (set to resistance/ohms) to dial exact values
- Ground back to battery negative
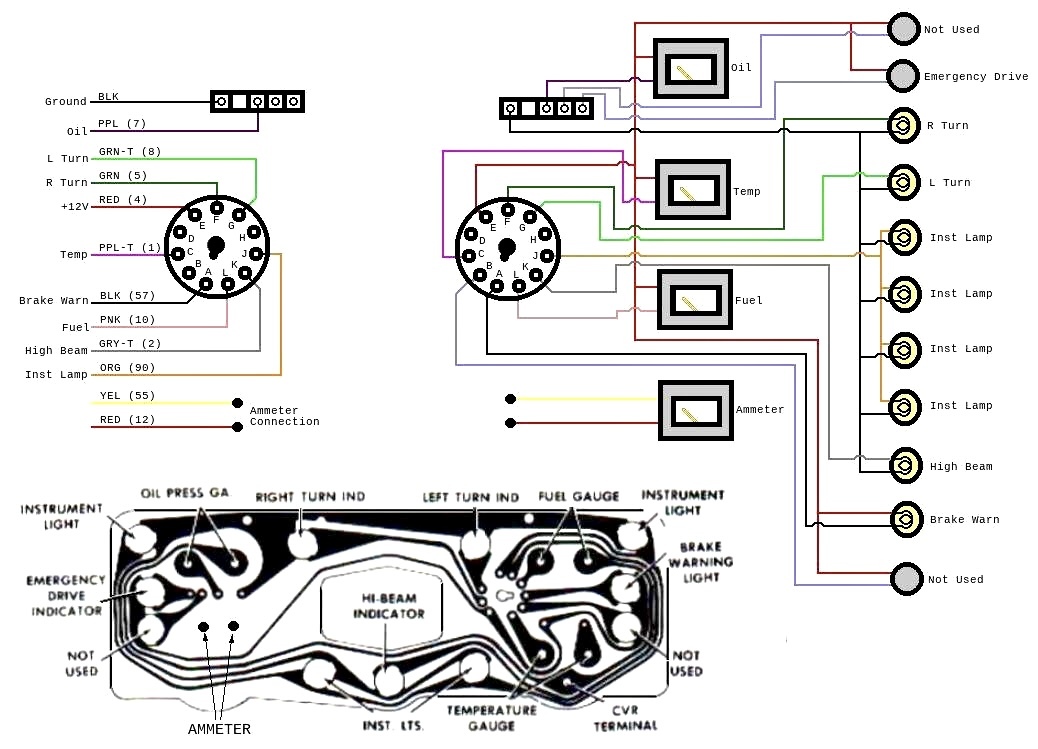
Cluster power path: +12V → Temperature gauge’s CVR (board voltage regulator) → Fuel and Oil gauges.
Rule: Never put raw 12V directly to the Fuel or Oil gauges—only the lights are fed 12V.
20:13 — Prepping Your FSJ Cluster for Testing
- Wear gloves.
- IPA-wipe the entire printed circuit, pins, and gauge tabs.
- Inspect the ribbon around the ammeter for discoloration/cracks. Ohm across questionable segments.
- Ensure the metal backplates and gauge tabs have clean, bare-metal contact.
- Lightly snug the board screws—do not crush the fiber backers.
23:37 — Testing the Temperature Gauge
Reference points (FSJ senders):
- ~73 Ω → near “C” (slightly warm)
- ~36 Ω → start of NORMAL band
- ~13 Ω → end of NORMAL band
- ~9–10 Ω → HOT (≈268–270 °F per ’76 TSM)
If Fuel or Oil misbehave, re-check the Temp/CVR first; it powers both.
28:47 — Oil Pressure Gauge: Full Sweep & Troubleshooting
Use the potentiometer to dial resistance and confirm the oil pressure gauge sweeps smoothly. More pressure = less resistance. If the needle won’t return or hangs, re-check the bezel, face, and ground contacts.
45:07 — Fuel Gauge: Testing, Restoring, and Oil-to-Fuel Conversion
Converting an Oil Gauge into a Fuel Gauge
The oil and fuel gauges use the same movement. With a face swap and calibration, an oil gauge becomes a fuel gauge—often cheaper if you buy the early ’74–’75 oil gauge.
FSJ fuel sender targets
- Empty ≈ 73 Ω
- Half ≈ 23 Ω
- Full ≈ 10 Ω
Conversion overview
- Uncrimp the oil gauge bezel and remove the face.
- Install the fuel faceplate or decal.
- Bench test with 23 Ω and calibrate by adjusting the two internal stops.
- Verify at Empty (73 Ω) and Full (10 Ω).
- Reassemble carefully—don’t overtighten.
This method is a proven way to save money while keeping your FSJ cluster accurate.
1:14:18 — Testing Lights & Turn Signals
Pins #5, #6, #12, and #13 control illumination, high beam, and turn signal indicators. These are the only components that take direct 12V during FSJ gauge cluster testing.
Troubleshooting Checklist
- All gauges peg high: Re-clean temp gauge tabs/backplate and pins; confirm CVR path and grounds.
- Random readings: Clean connectors and add a thin dielectric layer.
- Gauge dead, lights OK: Ensure power enters through the temp CVR post, not directly into Fuel/Oil.
- Won’t calibrate: Confirm clean backplate contacts and correct needle alignment.
- Darkened circuit near ammeter: Ohm-check and repair ribbon as needed.
Instrument Cluster Gauges & Circuit Board
- 1973–1985 Gauge Cluster Circuit Board
jeeprecyclers.com/1973-1985-gauge-cluster-circuit-board/ - 1973–85 Fuel Gauge
jeeprecyclers.com/full-size-jeep-1973-1985-cherokee-wagoneer-j-10-j-20-restored-fuel-gauge/ - 1973–75 Oil Pressure Gauge
(This gauge can be used on 1976–85 models, and can also be converted into a Fuel Gauge)
jeeprecyclers.com/engine-oil-pressure-gauge-for-1973-1975-wagoneer-cherokee-j-series-truck/ - 1976–85 Oil Pressure Gauge
jeeprecyclers.com/oil-pressure-gauge-for-1976-1984-wagoneer-grand-wagoneer-cherokee-j-series-truck/ - 1973–1985 Temperature Gauge w/ Built-In CVR (3-prong)
jeeprecyclers.com/1973-1985-temperature-gauge-w-built-in-cvr-3-prong/ - Instrument Cluster Vinyl Decals (1974–1985 Legacy Series)
jeeprecyclers.com/full-size-jeep-legacy-series-1974-1985-instrument-cluster-vinyl-decals/ - Copper Foil Tape (Amazon)
amazon.com/PATIKIL-Copper-Tape-Conductive-Adhesive/dp/B0DW8R938B - Acrylic Conformal Coating, Clear Finish (Amazon)
amazon.com/MG-Chemicals-Premium-Acrylic-Conformal/dp/B06XWGCKX5
Sending Units
- Oil Pressure Sending Unit (1973–1985)
jeeprecyclers.com/oil-pressure-sending-unit-for-1973-1985/ - Coolant Temperature Sending Unit (1973–1991)
jeeprecyclers.com/coolant-temperature-sending-unit-sensor-1973-1991/ - All Fuel Sending Units
jeeprecyclers.com/search/?query=Fuel-Sending-unit
Tools
- Digital 600 V Manual-Ranging Multimeter
jeeprecyclers.com/digital-600-v-manual-ranging-multimeter/ - Power Probe III Circuit Tester w/ Test Leads Combo Kit
jeeprecyclers.com/power-probe-iii-circuit-tester-with-test-leads-combo-kit/ - 10K Potentiometer (Amazon)
amazon.com/RV24YN20S-Potentiometer-Single-Inverter-Regulation/dp/B0F2HXWDNP/ - 3PCS Diamond Grip Terminal Cleaner Set (Amazon)
amazon.com/AYNEFY-Terminal-Repairing-Electrical-Connector/dp/B09Y27T1KH - Plow Terminal Cleaners (Amazon)
amazon.com/Innovative-Products-Of-America-8045/dp/B009SNMUMG - Micro Male Electrical Pin Cleaners (Amazon)
amazon.com/IPA-Tools-8043-Electrical-Cleaners/dp/B075KVKHNM
Cleaners
-
Isopropyl Alcohol, 99% (Amazon)
amazon.com/Swan-Isopropyl-Alcohol-99-Pint/dp/B001B5JT8C
Safety / Disclaimer
Always test with a fused power source (1–5A inline) to prevent damage. Wear gloves when handling boards to avoid corrosion from skin oils. Never feed raw 12V directly to Fuel or Oil gauges—power must enter through the temperature gauge’s CVR post.